Programming & IT Tricks . Theme images by MichaelJay. Powered by Blogger.

Copyright

Facebook

Post Top Ad

Search This Blog

Post Top Ad

Responsive Ads Here

Archive

Post Top Ad

Contact


Editors Picks

Follow us

Post Top Ad

Fashion

Music

News

Sports

Food

Technology

Featured

Videos

Fashion

Technology

Fashion

Label

Translate

About

Translate

Sponsor

test

Weekly

Comments

Recent

Connect With us

Over 600,000+ Readers Get fresh content from FastBlog

About

Showing posts with label Education. Show all posts

Tuesday, February 6, 2018

How Digital Technology is Reinventing “Personal Growth”


Aren’t you worried about the “digital generation”?
I am often asked this question and it happened again last week. The person asking — a male colleague in his mid-40s — was referring to what he saw as the negative effects of the instant and effortless access to information characteristic of an Internet Age.
His argument?
In a connected world where information is so easily available, the younger generation no longer have the right incentives to really “learn” anything. They don’t have (or even want) “ready knowledge”. This will inevitably have a negative impact on their analytical skills and, in turn, will kill creativity and (ultimately) thwart innovation.
In a word, my answer to this type of question is “No”.
I am not worried about the “digital generation” and remain cautiously optimistic about the future.
However, I do believe that we need to adopt a new understanding of “personal growth” in a digital age. Over the last few weeks, I have been thinking a lot about what this entails.
Here are two thoughts:
  • First, I think we should stop talking about “generations”. Such “generation-talk” obscures the new freedoms that now exist for everyone in a digital age.
  • And second, regardless of age, we need to ask: what kind of mindset (and related skillset) is necessary to flourish in a world where “knowledge” is readily available? For me, this means seeking out and embracing the opportunities for mutual learning that are created by digital technologies.

A “Post-Generation” World

We are used to living in a stable world of clearly demarcated generations.
We are all familiar with the labels: The Lost Generation, The GI Generation, The Silent Generation, Baby Boomers, Generation X, Millennials (Generation Y), Generation Z.
Each generation is associated with a distinct historical experience (WWI, WWII, the post-war boom, etc.) and a particular set of attitudes and values.
And, within each generation, there were clearly pre-defined career paths and other opportunities. People grew up in a certain way, received a certain type of education, found a certain type of job and, eventually, settled on a certain type of life.
And when you passed 45?
Well, there weren’t many options left. New opportunities were only available to the “next” (and younger generation) that were in touch with the new historical experience, the new technologies and values of a new world.
But, things have gradually changed. And here I agree with Gary Vaynerchuk:
Now, when you are in your 40s, there are still unprecedented opportunities for working and learning, and for changing your life.
The main reason for this is “technology”.
Digital technologies have created a more open, fluid and “flatter” world where generations no longer matter, at least if you embrace the right mindset and develop the right skills.

Why Digital Technologies Change Everything

Of course, there are shortcomings caused by the global proliferation of digital technologies. Such risks include a lack of privacy, accessibility to personal information and the easy dissemination of “fake news”.
But, in general the opportunities outweigh the challenges. Digital technologies offer everyone the possibility of connecting to a truly global community. This reality has the potential to open up new perspectives, jobs, friendships, learning opportunities, etc.
Digital technologies create a flatter and de-centralized world where empowering and experimentation prevail over controlling and planning. Everybody can now be an “entrepreneur”, a “creator” or an “artist” without first being accepted and acknowledged by any centralized authority.
Think of the new opportunities provided by YouTube, Medium and other content platforms. Anyone with a good idea and the drive and talent to implement their idea can reach a global audience or market. One of the most important benefits of digital technology is the possibility of being globally connected.

The Key to Personal Growth (and Success) in a Networked World

How then do we benefit from the unprecedented opportunities of a digital age?
A lot has been written about personal growth and development.
Suggestions on how to improve yourself are everywhere. You should wake up early, read a book every week (or even better every day), work out, eat healthy, take cold showers, etc.
Certainly, there might be truth to all of these things for some people. However, one thing you don’t hear about very often is that you should be more open to the experience of “mutual learning”. I really believe that this is the key to personal growth and success these days.
Young, middle aged and older people that embrace the digital world should not look at each other as being part of a generation. Particularly, when they all share the same mindset. Instead, they are part of a globally connected community in which every member is both a teacher and a student. You see this at technology meetups, hackathons and innovation workshops.
If I just look at my own experience as a professor, I can see this transformation. I used to consider myself as a teacher, inspirer, motivator of the younger generation. My job was to prepare them for the new world, help them build a career.
But this changed recently. As I have mentioned before, I view myself more now as an influencer or, perhaps even better, a collaborator.
The world is changing so fast these days. The exponential growth of technology cannot be ignored. There are so many challenges and new opportunities. And what I found is that teaching has become more and more like a dialogue, a two-way conversation so to speak, where a process of mutual learning happens during every “lecture”.
The last few years, students have made me aware of new apps, new platforms, new values, new perspectives and a new way of communicating that indeed opened many different doors and helped me engage in an on-going process of “learning, un-learning and re-learning” (to use an expression from one of my former students).
There is no need to “settle” anymore. In fact, “settling” may come with certain risks as the speed of technological change means that the future is more uncertain than ever before.

Welcome to the World of Mutual Learning

The digital age has created and continues to create multiple new opportunities.
Thinking in terms of generations is over. Instead, it is all about adopting the right mindset.
In order to grow and succeed in a digital age, you need to capture/embrace the opportunities for mutual learning and self-improvement necessary for building the future together.

Thursday, January 25, 2018

What It Takes to Train The Next Generation of Innovators


This article was published on GrowthX Academy’s Blog on August 28, 2017.

Sean Sheppard, founder of GrowthX Academy, discusses the critical skills for the upcoming “Innovation Economy”.

“How do we educate people for a future we can’t predict?” It’s a question that’s been on my mind a lot lately — and, it turns out, it’s been on Sean Sheppard‘s as well.
Sean is a serial entrepreneur, venture capitalist, and the founder of GrowthX and the GrowthX Academy. He’s someone who’s been steeped in modern sales, marketing and growth hacking methods, so I was excited to get the chance to chat with him recently about the skills he believes will be critical for the coming “Innovation Economy.”

The Problem: Our Outdated Education System

Most of us have the sense that our education systems haven’t kept pace with innovation. In our conversation, Sean explains how deeply behind we’ve fallen:
“The modern education system was developed in the Age of Enlightenment to support the Industrial Revolution of the 19th century as a way to take people off of farms and educate them to work in factories. That’s why there are school bells. They’re meant to mimic factory whistles. That’s why we have the people lined up in desks, in rows, because that’s how an assembly line is constructed.”
As Sean notes, this transition was critical. “In the 1900s, 40 percent of the jobs in this country were farming jobs. Today, only 2 percent are farming jobs.” Moving from an agriculture-driven society to an industrial one required education systems that prepared students for the kinds of jobs that were becoming available.
Sean points out that we’re in a similar transition now. “Very soon, 40 to 50 percent of the jobs are going to be replaced by robots and automation. We’re now entering what the World Economic Forum has called the fourth industrial revolution: the ‘Innovation Economy.’”

The Four Factors of Future Effectiveness

So what changes do we need to make to prepare for this coming transition? What skills do students and professionals need to practice today to build competency for future jobs? Sean highlights four pillars in particular that form the basis of his approach at GrowthX (I’ll give you a hint — none of them involve getting an MBA or liberal arts degree).

1. Mindset

I was happy to hear Sean touch on mindset as one of his four pillars, as it’s something I’ve been hammering into my team at Web Profits. Sean and I agree — the future belongs to those who adopt a growth mindset, rather than a fixed mindset.
None of us can predict with 100% certainty what the future of the Innovation Economy looks like (except maybe Mark Zuckerberg). Limiting yourself with a fixed mindset — one that restricts you to considering things as they are, not as they might be — could prevent you from identifying and taking advantage of opportunities as they arise.
That’s somewhat obvious, but Sean added an important note: “There is no distinction between personal and professional development in the Innovation Economy.” You can’t think of your future performance in terms of your career alone. Embracing the growth mindset Sean suggests means recognizing that every part of yourself — from your work to your health and beyond — can, and should, be improved upon.

2. Mastery

Having a growth-based mindset provides needed flexibility for an unclear future. But mindset alone doesn’t fully answer the question of how you prepare today for jobs that may not exist until tomorrow.
That’s where competency-based education comes into play, according to Sean. “Competency-based education models will be the future of education. It’s the idea that we can measure people the same way you and I measure marketing efforts in real-time. We can assess people quickly about whether or not they’ve achieved the competency.”
Out of competency, Sean suggests, mastery grows. “You acquire the knowledge; there’s a framework for that. You practice it to demonstrate that you can acquire the competencies, and then through the repetitive iteration of that, you develop proficiency and then, ultimately, mastery.”
Sean’s model makes more sense when applied to a hypothetical job. Suppose you want to become a growth hacker. There’s no “official” training program; no university you can attend. So how do you prepare for this job? According to Sean, you study the existing knowledge that’s available. You identify and develop the core competencies involved in the job. Then, through practice, iterative improvement and the simple investment of time, you eventually achieve mastery.
The beauty of this approach is that it’s available to everyone. Sean states, “It’s about being a learn-it-all not a know-it-all. It’s about understanding that the foundation of mastery is that you do not have to be born with some natural level of inborn talent or set of skills.”

3. Career

Transforming personal and professional mastery into a career will look different than it used to, according to Sean. “As an individual you have to focus on your career development, and as a manager and a leader, you have to focus on helping people develop their careers.”
Long tenures with a single company are practically nonexistent these days, and our transition to the Innovation Economy will only accelerate this change. Succeeding in this future — in whatever role you define yourself — will require that you take an active role in managing your career, as well as helping guide the careers of others.

4. Community

Mindset, mastery and career are all factors you develop on your own. But, in Sean’s opinion, where things really come together is in a focus on community. “The modern education requires diversity of thought, opinion, background, and experience from a whole host of different points of view.”
Simply put: you need a diverse community whose wisdom you can draw on to advance your learning beyond what you’re capable of on your own.
Sean attempts to build communities like these through GrowthX (the next session starts September 12th), but you can also cultivate your own community by connecting with older mentors, those in other industries and thought leaders you admire.
Now isn’t the time to remain idle. By focusing on updating your mindset, mastery, career and community, you’ll be ready to face whatever challenges come your way in the new Innovation Economy.

This article was published on GrowthX Academy’s Blog on August 28, 2017.

Thursday, January 18, 2018

Making your own Face Recognition System


Face recognition is the latest trend when it comes to user authentication. Apple recently launched their new iPhone X which uses Face ID to authenticate users. OnePlus 5 is getting the Face Unlock feature from theOnePlus 5T soon. And Baidu is using face recognition instead of ID cards to allow their employees to enter their offices. These applications may seem like magic to a lot of people. But in this article we aim to demystify the subject by teaching you how to make your own simplified version of a face recognition system in Python.

Background

Before we get into the details of the implementation I want to discuss the details of FaceNet. Which is the network we will be using in our system.

FaceNet

FaceNet is a neural network that learns a mapping from face images to a compact Euclidean space where distances correspond to a measure of face similarity. That is to say, the more similar two face images are the lesser the distance between them.

Triplet Loss

FaceNet uses a distinct loss method called Triplet Loss to calculate loss. Triplet Loss minimises the distance between an anchor and a positive, images that contain same identity, and maximises the distance between the anchor and a negative, images that contain different identities.
Figure 1: The Triplet Loss equation
  • f(a) refers to the output encoding of the anchor
  • f(p) refers to the output encoding of the positive
  • f(n) refers to the output encoding of the negative
  • alpha is a constant used to make sure that the network does not try to optimise towards f(a) - f(p) = f(a) - f(n) = 0.
  • […]+ is equal to max(0, sum)

Siamese Networks

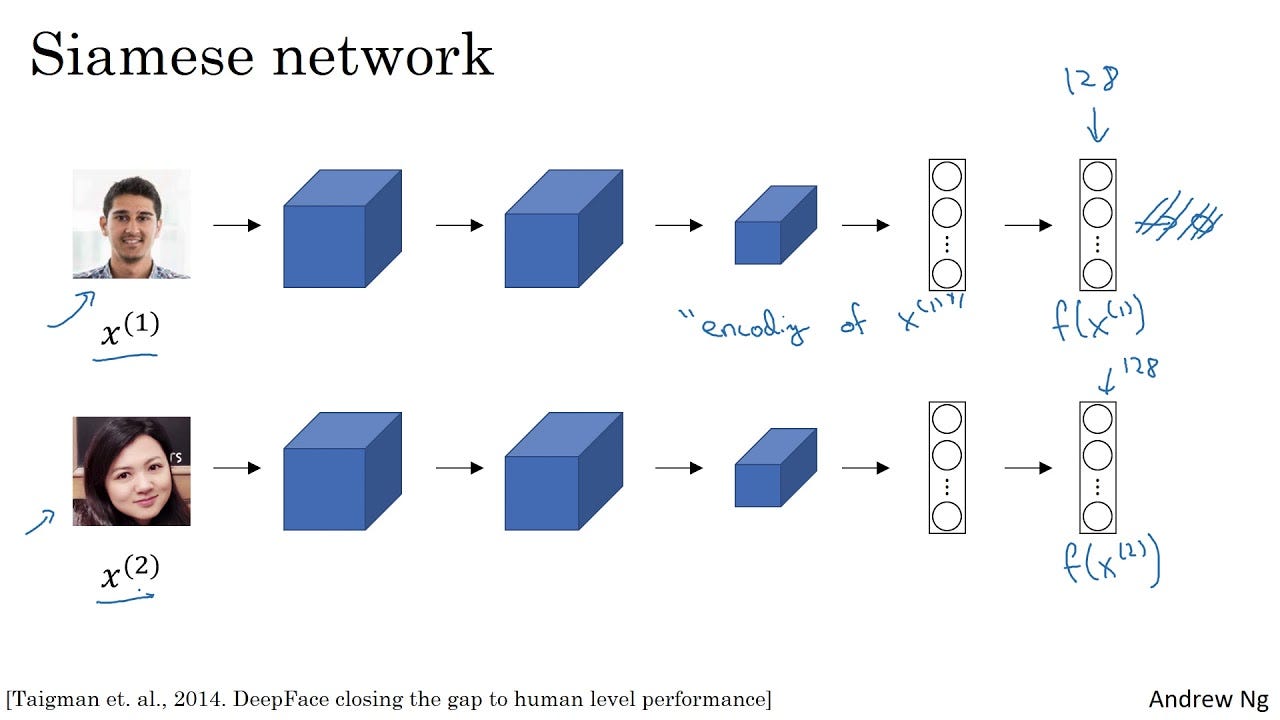
Figure 2: An example of a Siamese network that uses images of faces as input and outputs a 128 number encoding of the image. Source: Coursera
FaceNet is a Siamese Network. A Siamese Network is a type of neural network architecture that learns how to differentiate between two inputs. This allows them to learn which images are similar and which are not. These images could be contain faces.
Siamese networks consist of two identical neural networks, each with the same exact weights. First, each network take one of the two input images as input. Then, the outputs of the last layers of each network are sent to a function that determines whether the images contain the same identity.
In FaceNet, this is done by calculating the distance between the two outputs.

Implementation

Now that we have clarified the theory, we can jump straight into the implementation.
In our implementation we’re going to be using Keras and Tensorflow. Additionally, we’re using two utility files that we got from deeplearning.ai’s repo to abstract all interactions with the FaceNet network.:
  • fr_utils.py contains functions to feed images to the network and getting the encoding of images
  • inception_blocks_v2.py contains functions to prepare and compile the FaceNet network

Compiling the FaceNet network

The first thing we have to do is compile the FaceNet network so that we can use it for our face recognition system.
import os
import glob
import numpy as np
import cv2
import tensorflow as tf
from fr_utils import *
from inception_blocks_v2 import *
from keras import backend as K
K.set_image_data_format('channels_first')
FRmodel = faceRecoModel(input_shape=(3, 96, 96))
def triplet_loss(y_true, y_pred, alpha = 0.3):
    anchor, positive, negative = y_pred[0], y_pred[1], y_pred[2]

    pos_dist = tf.reduce_sum(tf.square(tf.subtract(anchor,
               positive)), axis=-1)
    neg_dist = tf.reduce_sum(tf.square(tf.subtract(anchor, 
               negative)), axis=-1)
    basic_loss = tf.add(tf.subtract(pos_dist, neg_dist), alpha)
    loss = tf.reduce_sum(tf.maximum(basic_loss, 0.0))
   
    return loss
FRmodel.compile(optimizer = 'adam', loss = triplet_loss, metrics = ['accuracy'])
load_weights_from_FaceNet(FRmodel)
We’ll start by initialising our network with an input shape of (3, 96, 96). That means that the Red-Green-Blue (RGB) channels are the first dimension of the image volume fed to the network. And that all images that are fed to the network must be 96x96 pixel images.
Next we’ll define the Triplet Loss function. The function in the code snippet above follows the definition of the Triplet Loss equation that we defined in the previous section.
If you are unfamiliar with any of the Tensorflow functions used to perform the calculation, I’d recommend reading the documentation (for which I have added links to for each function) as it will improve your understanding of the code. But comparing the function to the equation in Figure 1 should be enough.
Once we have our loss function, we can compile our face recognition model using Keras. And we’ll use the Adam optimizer to minimise the loss calculated by the Triplet Loss function.

Preparing a Database

Now that we have compiled FaceNet, we are going to prepare a database of individuals we want our system to recognise. We are going to use all the images contained in our images directory for our database of individuals.
NOTE: We are only going to use one image of each individual in our implementation. The reason is that the FaceNet network is powerful enough to only need one image of an individual to recognise them!
def prepare_database():
    database = {}
    for file in glob.glob("images/*"):
        identity = os.path.splitext(os.path.basename(file))[0]
        database[identity] = img_path_to_encoding(file, FRmodel)
    return database
For each image, we will convert the image data to an encoding of 128 float numbers. We do this by calling the function img_path_to_encoding. The function takes in a path to an image and feeds the image to our face recognition network. Then, it returns the output from the network, which happens to be the encoding of the image.
Once we have added the encoding for each image to our database, our system can finally start recognising individuals!

Recognising a Face

As discussed in the Background section, FaceNet is trained to minimise the distance between images of the same individual and maximise the distance between images of different individuals. Our implementation uses this information to determine which individual the new image fed to our system is most likely to be.
def who_is_it(image, database, model):
    encoding = img_to_encoding(image, model)
    
    min_dist = 100
    identity = None
    
    # Loop over the database dictionary's names and encodings.
    for (name, db_enc) in database.items():
        dist = np.linalg.norm(db_enc - encoding)
        print('distance for %s is %s' %(name, dist))
        if dist < min_dist:
            min_dist = dist
            identity = name
    
    if min_dist > 0.52:
        return None
    else:
        return identity
The function above feeds the new image into a utility function called img_to_encoding. The function processes an image using FaceNet and returns the encoding of the image. Now that we have the encoding we can find the individual that the image most likely belongs to.
To find the individual, we go through our database and calculate the distance between our new image and each individual in the database. The individual with the lowest distance to the new image is then chosen as the most likely candidate.
Finally, we must determine whether the candidate image and the new image contain the same person or not. Since by the end of our loop we have only determined the most likely individual. This is where the following code snippet comes into play.
if min_dist > 0.52:
    return None
else:
    return identity
  • If the distance is above 0.52, then we determine that the individual in the new image does not exist in our database.
  • But, if the distance is equal to or below 0.52, then we determine they are the same individual!
Now the tricky part here is that the value 0.52 was achieved through trial-and-error on my behalf for my specific dataset. The best value might be much lower or slightly higher and it will depend on your implementation and data. I recommend trying out different values and see what fits your system best!

Building a System using Face Recognition

Now that we know the details on how we recognise a person using a face recognition algorithm, we can start having some fun with it.
In the Github repository I linked to at the beginning of this article is a demo that uses a laptop’s webcam to feed video frames to our face recognition algorithm. Once the algorithm recognises an individual in the frame, the demo plays an audio message that welcomes the user using the name of their image in the database. Figure 3 shows an example of the demo in action.
Figure 3: An image captured at the exact moment when the network recognised the individual in the image. The name of the image in the database was “skuli.jpg” so the audio message played was “Welcome skuli, have a nice day!”

Conclusion

By now you should be familiar with how face recognition systems work and how to make your own simplified face recognition system using a pre-trained version of the FaceNet network in python!
If you want to play around with the demonstration in the Github repository and add images of people you know then go ahead and fork the repository.
Have some fun with the demonstration and impress all your friends with your awesome knowledge of face recognition!

Monday, January 15, 2018

The big secret about “tech people”, fixing things and how to control your technology


Hint: it’s neither hard nor dangerous

In this article, I’d like to talk about the “divide in technology” and how you can become proficient at solving tech problems even if you have never done it before.

The Gap

There is a fundamental divide in how people deal with tech problems. It seems that some people see computers, smartphones and other technical devices as “black boxes”, most of the time doing what they want, but at times showing frustrating errors or just plainly stopping to work.
Others (with a winking eye referred to as “tech people”) see those devices as a system of parts: hardware, software and things that run on the internet. While errors and failures are certainly annoying, they are merely symptoms that some part of the system is malfunctioning. And since it’s technology, the various components can be fixed.
The difference between those groups is that the first group is intimidated by technology — you might hear someone say “Oh, he (the computer) doesn’t like me”, as if it’s a personal thing and the technological system can be blamed. The other group doesn’t put the blame on the system as a whole, vicious entity, but instead treat it as it is: a collection of parts.
It’s no shame to belong to group one, after all, technological education and systems thinking is rarely taught and if you never had someone else introduce you to the topic, you were likely never exposed to the ideas behind it. However, I encourage you to read on and discover it’s quite easy to understand and to switch over to the “tech” side in no time.
Why should you do this? Because it gives you power and control over the things you own. You are absolutely capable of fixing and repairing both software and hardware problems, once you understand the basics. And each time you succeed in fixing something, you will gain confidence and experience. Plus, it’s actually pretty fun.

Everything is just a collection of parts

As mentioned in the intro, every piece of technology is a quite elaborate collection of parts, divided into hardware and software. The hardware is the actual thing that you carry around, most of the times small boards or chips that fulfill a certain function.
Two good things: those components are similar on almost all systems (I’m talking about computers, tablets and smartphones).
They all have a processor unit (doing the computations), a permanent storage (where all your photos are for instance) and a temporary storage (supplying the files that are in use right at the moment to the processor).
Those three are absolutely necessary for the basic functions. Then, of course, you have things that support everything else: batteries, screens, sensors, input devices (keyboards, trackpads), wireless chips and a series of boards connecting everything together.
The second good thing is that you don’t need to understand how each of those components work (or even how the system works at all) and you can still fix the system as a whole.
On top of this, there is software: an operating system and applications running on this system. Again, you don’t need to understand how this all works, just be aware of its existence.

Have you tried turning it off and on again?

It seems like a tired old joke, but it’s quite true. More than half of all errors on almost all systems can be “fixed” by turning off the system and restarting it.
This allows the system to begin with a blank slate, it reloads the software and starts all calculations afresh.
It is truly the one thing that a “tech person” will do first when trying to fix a problem. Switch everything off (completely, ideally also disconnect the power), then back on. You will be surprised how many errors are never showing up again! This technique can be adapted to resetting and reinstalling software, but we’ll get into that in a later article.
Turn it off. Turn it back on. Fix most of your errors.

You can’t really break something

I find that most of the time, people are not trying to fix things because they are afraid to damage those things permanently.
Another good thing (this article is full of positivity): you can’t really break something as long as you don’t physically break part of the system. Keeping your technology dry and reasonably clean is a good way to start.
It’s also quite unlikely that you damage your software beyond repair. Rest assured that there is almost always a way to completely reset everything. Which brings us to the next point and then we will go into the details.

Store your files securely

As mentioned above, your files are stored on the permanent storage (hard drive) of your device. Luckily, in the last decade it has gotten incredibly easy to also store all your files in the “cloud”, meaning a separate computer somewhere on the internet, owned by a company.
The most famous of these services, like Dropbox, iCloud, GoogleDrive and OneDrive are reliable and widely used, while alternative might be suited to special needs.
I won’t go into any detail on how to choose the best service, you should be fine with typing “best cloud storage providers 2018” into Google.
The point is: while I said you can’t break anything on your system, you might lose your files, programs, settings and achievements if you don’t save them on another device first.
Use a cloud storage, external hard drive or another computer to move important documents out of your system for the time of the repairs.

Things change, for better or for worse, it’s never just you

You know the saying: never change a running system. Many software developers don’t seem to heed this, they are constantly updating, improving, iterating and changing.
Most of these changes are benign, while sometimes they break the very thing that you rely on for your work. It is annoying, it costs energy and time.
Yet, we all have to accept it, sort of the price we pay for getting accelerated technological progress.
And despite the myriads of different technological configurations, operating systems, smartphones and programs there are, there is a high chance that someone, somewhere has already had the same problem and found a solution and shared it with the world.
Which brings us to…

The big secret

This is the big one. The secret you have been waiting for. How do “tech people” actually fix things?
The answer, of course, is a simple process.
They google the error and then follow whatever other people have tried.
Yes, that’s all. That is how most of the errors get solved and how most things get repaired and in fact, how most things are learned.
You just google what you are trying to do and then spend some time going through the answers. It might not be the first answer that helps you, but chances are that somewhere in the first five answers, something will.
The art is within the right phrasing of the question. I’ll walk you through an example: recently, my 3D software “Blender” started to display black boxes instead of the usual interface. It was mildly annoying, so I tried to fix it.
Here is how you construct the google query: type the program name first, then add a short and succinct description of what’s wrong. For instance: “blender 3d displaying black user interface”. Here is what Google gives me:
Click on the first answer.
And I simply go to the first answer, which is a site called stackexchange.com. It is a platform/ community where lots of tech questions are answered and it is quite trustworthy. Reading the question that someone else asked, I think that they have the same issue. And behold, below there is an answer.
Turn off nVidia shadowplay, thanks J. Larsen!
I know that shadowplay is a program for my graphics card, so I turned it off.
It fixed the issue, no more black boxes.
If I didn’t know how to turn it off, guess what: I’d google it (“turning off nvidia shadowplay”). There are tutorials for everything online.
This principle works with any error message, too.
Just don’t click it away angrily, look at it, read it and if you don’t understand it, copy the exact words into Google, combined with the software from which it came, for instance “windows 10 error 0x80200056”. It looks like gibberish and I have no clue what it means, but other people do!
Put it into Google, read the first answer (like seriously, read it like a really good recipe) and follow it.
Remember, you are quite unlikely to break anything, so just follow the steps.
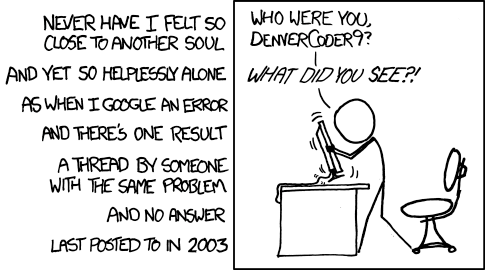
And then there is this case:
https://imgs.xkcd.com/comics/wisdom_of_the_ancients.png
Yes, there is a chance that your problem is absolutely rare and unique. It happens to all of us. We live with it. We reinstall the whole system. We buy a new computer. But we can always say that we tried.
I’ll probably go into a little more depth on this next week, but for now, you have a basic understanding of your tech!
The more you fix and try and change, the more confident you will become.
Soon, you will be one of the “tech people”.

Apple Will Reject Your Subscription App if You Don’t Include This Disclosure


Have you read Paid Applications Agreement, Schedule 2, Section 3.8(b)?

If you’ve ever submitted an app to the App Store, you know the frustration when Apple rejects your submission. Even more so when you thought you’d followed all the rules. As it turns out, Apple can bury requirements wherever they want, and it’s your burden to keep up.
About a year ago, Apple started rejecting apps that didn’t comply with Schedule 2, Section 3.8(b) of the Paid Applications Agreement, a verbose list of self-evident truths about subscriptions. The Paid Applications Agreement is a 37-page document that you had to agree to before you could submit your app. It is only available via iTunes Connect in the form of downloadable PDF.
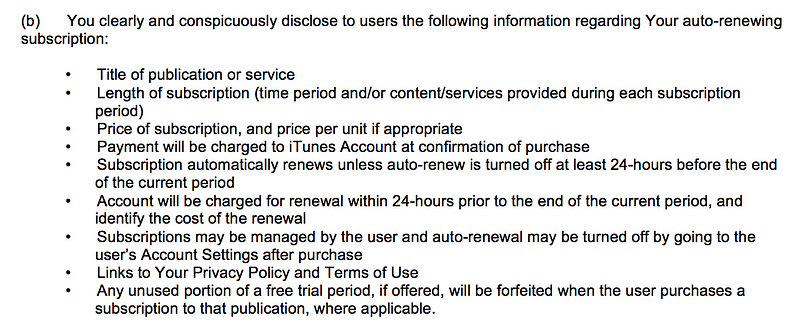
The actual contents of Schedule 2, Section 3.8(b):
I really like the part about privacy policies.
3.8(b) requires that you “clearly and conspicuously disclose to users” all of the above bullets. The first few items seem harmless enough but then we start to get off into the weeds.
Apple wants you to reproduce, “clearly and conspicuously”, all the details of auto-renewing subscriptions. This information should be part of the standard StoreKit subscription purchase flow. None of these bullets have anything app specific to them. They are just boilerplate legalese.
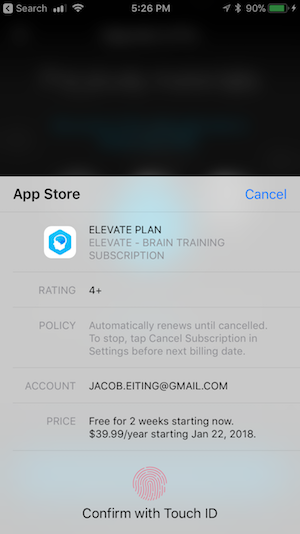
iOS’s purchase UI, more than enough information.
Apple has an iOS level user interface flow for in-app purchases that is quite good as of iOS 11. This view already covers most of the in-the-weeds bullets, except telling users about the 24-hour renewal policy.
Requiring every developer to implement their version of 3.8(b) is costly and creates a fractured experience for the user. Apple should be putting it in the standard sheet. But it’s Apple’s walled garden. When they say jump, you say “fine, whatever.”

How to Comply With 3.8(b)

According to recent rejections that I’ve seen (as of Jan. 8th, 2018), reviewers are being more particular about what your purchase flow requires. From a recent rejection:
Adding the above information to the StoreKit modal alert is not sufficient; the information must also be displayed within the app itself, and it must be displayed clearly and conspicuously during the purchase flow without requiring additional action from the user, such as opening a link.
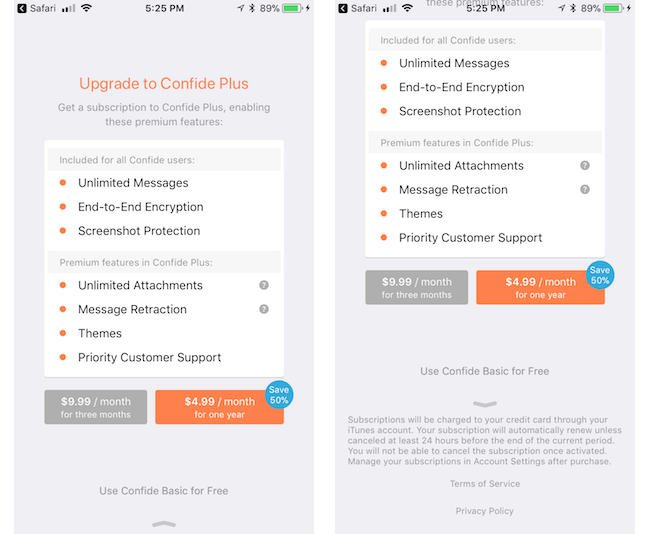
All of the information in 3.8(b) must be “displayed clearly and conspicuously during the purchase flow without requiring additional action from the user, such as opening a link.” Your beautiful and compact purchase flow must include in it, somewhere, nine bullets written by a lawyer.
Confide, recently updated, achieved it with the following:
According to one reviewer, being below the fold with a leading arrow qualifies as “clearly and conspicuously.”
For another data point, I know of one recently rejected developer who had the same information, but in another view that was linked from the purchase flow with a button. This did not qualify (according to one reviewer).

A Template

Include a customized version of the following “clearly and conspicuously” in your purchase flow:
A [purchase amount and period] purchase will be applied to your iTunes account [at the end of the trial or intro| on confirmation].
Subscriptions will automatically renew unless canceled within 24-hours before the end of the current period. You can cancel anytime with your iTunes account settings. Any unused portion of a free trial will be forfeited if you purchase a subscription.
For more information, see our [link to ToS] and [link to Privacy Policy].
Put it on the screen where you initiate the in-app purchase, below the fold might be OK, but you might want to put something to lead users there.
UPDATE: Readers are telling me it may also be required that you include it in your app store description. It’s a much easier change to include so I recommend you add it there to.

Why has Apple Taken a Legal Problem and made it Ours?

Apple shouldn’t be burying submission requirements in the bodies of contracts that nobody will read. If Apple wants developers to know something, they should put it in the App Store Guidelines, HIG, or developer documentation. The cost of making changes in a software project right at the end can be astronomical. Dropping a bomb like this on developers at submission shows a total lack of regard for our costs.
Why didn’t they just update the iOS in-app purchase sheet? I speculate that Apple discovered some legal exposure from in-app subscriptions and fixed it with lawyers instead of designers. This problem could be universally solved with an iOS update, but I think some side effect of Apple being a vast, lumbering bureaucracy made forcing 3.8(b) onto developers the more politically convenient path. Apple, if you are reading this, please either update the iOS sheet or move the requirements to the App Store guidelines, so fewer developers get caught unawares.
RevenueCat is the best way to implement subscriptions in your mobile app. We handle all the complicated parts so you can get back to building. Request an invite today at https://www.revenuecat.com/

Friday, January 12, 2018

Learn mobile app development with these 10 online courses


Top 10 online courses to help your learn mobile app development plus some advice from the experts on why app prototyping makes all the difference!

Thinking about becoming a Mobile App Developer? You’re in luck! There’s never been a better time to learn mobile app development. Take a look:
For budding developers, it’s time to hop aboard the gravy train. But what’s the first step in learning mobile app development? What courses should you sign up for? Should you teach yourself app development? We’ve got you covered.
And yes, the first step is learning how to prototype a mobile app. Learn why here — plus get our top 10 online courses on mobile app development to get you started right away, no matter where you are!

10 free and paid online courses to help you learn mobile app development

Here are our top 10 online courses to help you learn mobile app development:

1 — Android Development Tips Weekly series on Lynda

Teach yourself app development with this series of Android development tips by David Gassner.
Each week, David shares techniques to help you speed up your coding, improve app functionality or make your apps more reliable and refined.
The tutorials cover developing the app’s user interface, backend processing and open source libraries, to get your coding knowledge off the ground even quicker.
  • Level: Beginner — Intermediate
  • Commitment: approximately 3h per video
  • Price-point: 30-day free trial, from $19.99 thereafter

2 — Mobile App Development for Beginners on Udemy

Dee Aliyu Odumosu’s mobile app development course is ideal if you’re looking to break into iOS.
Learn how to create and customize 10+ iPhone apps (using Swift 3 and Xcode 8) with easy step-by-step instructions. The course begins with implementation of basic elements — UILabel, UIButton, UITextField etc. — Auto Layout and multiple-sized icons, with more advanced classes covering memory issues, storyboarding and displaying rich local notifications.
Note that this course requires you to own and already be familiar with Mac.
  • Level: Beginner
  • Commitment: approximately 33 hours
  • Price-point: $10.99 (New Year discount, was $50.00)

3 — iOS App Development with Swift Specialization on Coursera

This is the ultimate Swift for iOS development course, brought to you by Parham Aarabi and the University of Toronto.
Using XCode, Parham will teach you how to design elegant interactions and create fully functioning iOS apps, such as the photo editing app for iPhone, iPad, and Apple Watch. The course also includes best practices to help you become proficient in functional Swift concepts.
Note that this course requires you to own and already be familiar with Mac.
  • Level: Intermediate (some previous experience required)
  • Commitment: 6 weeks
  • Price-point: 7-day free trial, $49 per month thereafter

4 — Introduction to Mobile Application Development using Android on edX

Learn mobile app development and the basics of Android Studio in Jogesh K Muppala’s introduction to the Android platform.
In this 5-week course, you’ll explore the basics of Android application components as well as Activities and their lifecycle, some UI design principles, Multimedia, 2D graphics and networking support for Android.
  • Level: Beginner
  • Commitment: 6 weeks
  • Price-point: free

5 — Full Stack Web and Multiplatform Mobile App Development Specialization on Coursera

If you’re learning mobile application development for Android and found the above course useful, try this course out next.
Here you’ll have the chance to build complete web and hybrid mobile solutions, as well as master front-end web, hybrid mobile app and server-side development.
  • Level: Intermediate (some previous experience required)
  • Commitment: approximately 20 weeks
  • Price-point: 7-day free trial, $39 per month thereafter

6 — iOS 9 and Swift 2: From Beginner to Paid Professional on Skillshare

Mark Price’s online course for iOS Swift is everything you need to know about iOS 9 development.
This is another great set of classes for novice iOS coders. Build 15+ apps for iOS 9, learn swift 2.0 and publish apps to the App Store. Warmups, class projects and exercises will help you keep on top of the workload.
  • Level: Beginner
  • Commitment: approximately 37 hours
  • Price-point: from $15 a month

7 — The iOS Development Course That Gets You Hired on Career Foundry

Jeffrey Camealy presents the iOS Development course to get your hired.
1-on-1 mentorship from industry experts and real-world projects complement a set of 6 structured modules. The course covers the very basic principles of iOS development and takes you right to the point of submitting an app to the App Store.
  • Level: Beginner
  • Commitment: 6 months
  • Price-point: $4000 (payment plans available)

8 — Get Started With React Native on TutsPlus

Markus Mühlberger’s course for React Native is perfect for anyone who wants to code for multiple mobile platforms.
Learn how to create and customize UI elements, build user interaction, and integrate third-party components into apps for both iOS and Android. Upon completion, you’ll be able to write mobile apps in React Native.
  • Level: Intermediate
  • Commitment: 1.2 hours
  • Price-point: $29 a month

9 — Build a Simple Android App with Java on Treehouse

Ben Deitch’s course will help you build simple mobile apps for Android with Java, without any prior knowledge.
Best-suited to budding Android developers, this course will explore programming in Android and some very basic concepts of the Android SDK. By the end of the course, you’ll have a working knowledge of how a basic app works.
  • Level: Beginner
  • Commitment: 1.5 hours
  • Price-point: from $25 a month

10 — Try iOS on Code School

Gregg Pollack’s tutorials on iOS app development from the ground up and requires only basic coding experience.
Write your first iPhone app code and learn about different UI elements, such as buttons, labels, tabs and images. Upon completion, you’ll be able to connect to the internet to fetch data, build out table views and navigate between different areas of your app.
  • Level: Beginner
  • Commitment: 6–8 hours
  • Price-point: $29 a month
It’s an exciting time for mobile app developers. And as you can see, there are plenty of resources out there to help get your career off the ground. But don’t forget to look at the big picture.
Prototyping is an integral part of the mobile app life cycle. Download Justinmind now and explore a prototyping tool that’s made with the entire product team in mind.

Wednesday, January 10, 2018

JavaScript — Shorthand Variable Assignment


A three minute introduction into shorthand variable assignment

This article will take a (very) quick look at shorthand variable assignment in JavaScript.

Assigning Variables to Other Variables

As you’re probably aware, you can assign values to variables separately, like this:
var a = 1;
var b = 1;
var c = 1;
However, if all variables are being assigned equal values, you can shorthand and assign the variables like this:
var a = b = c = 1;
The assignment operator = in JavaScript has right-to-left associativity. This means that it works from the right of the line, to the left of the line. In this example, here is the order of operation:
  • 1 — First, c is set to 1.
  • 2 — Next, b is set equal to c which is already equal to 1. Therefor, b is set to 1.
  • 3 — Finally, a is set equal to b which is already equal to 1. Therefor, a is set to 1.
As you can now see, the shorthand above results in a, b, and c all being set to 1.
However, this is not a recommended way to assign variables. That’s because in the shorthand variable assignment shown above, we actually never end up declaring variables b or c. Because of this, b and c wont be locally scoped to the current block of code. Both variables b and c will instead be globally scoped and end up polluting the global namespace.

Using Commas When Assigning Variables

Lets look at a new example. Consider the following variable declarations and assignments:
var d = 2;
var e = 3;
var f = 4;
We can shorthand this code using commas:
var d = 2, e = 3, f = 4;
As you see, we are separating each variable assignment with a comma which allows us to assign different values to each variable.
For ease of reading, most coders who prefer using the comma method will structure their variable assignments like this:
var d = 2, 
    e = 3, 
    f = 4;
Best of all, in the shorthand variable assignment shown above, we are declaring all three variables: d, e, and f. Because of this, all variables will be locally scoped and we’re able to avoid any scoping problems.

Want to Learn More Shorthands?

Check out my other articles on shorthand coding techniques in JavaScript:

Closing Notes:

Thanks for reading! If you’re ready to finally learn Web Development, check out: The Ultimate Guide to Learning Full Stack Web Development in 6 months.
If you’re working towards becoming a better JavaScript Developer, check out: Ace Your Javascript Interview — Learn Algorithms + Data Structures.

Interested for our works and services?
Get more of our update !